
Photoshop Coverage Tutorial
How to calculate skin coverage percentage in Adobe Photoshop
For Flight Rising users who wish to create their own Custom Skins for their dragons, there are two types of Blueprints that can be used to submit to the Skins Queue. The Accent Blueprints are for any design that covers 30% or under of the original dragon illustration’s surface. The Skins Blueprints are for any design that covers over 30%. The tutorials below can be used to calculate your design’s coverage percentage so you know whether to submit a design using a Skin or Accent Blueprint.
You will need a version of Adobe Photoshop to use this tutorial.
Step 1: Open Your File
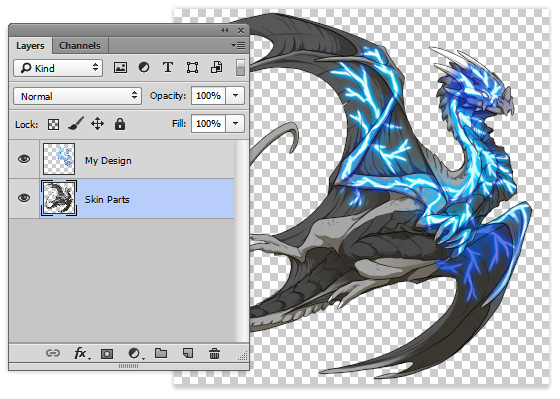
When you open your Skin file, make sure it includes a layer of the original dragon illustration that’s aligned correctly underneath your accent:
If you have not done so already, you will need to resize your image. Under the Image menu, navigate to to Image--> Image Size and the following dialogue box will open.
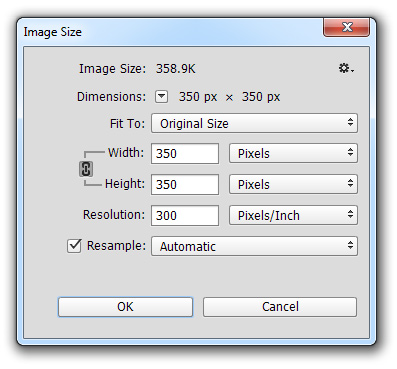
Change the image height and width to 350 x 350 pixels and hit “OK.”
Step 2: Create an Alpha Layer
Go to your Layers palette. If you can not find the Layers palette, go to the Windows menu, navigate to Windows--> Layers to make it appear or disappear.
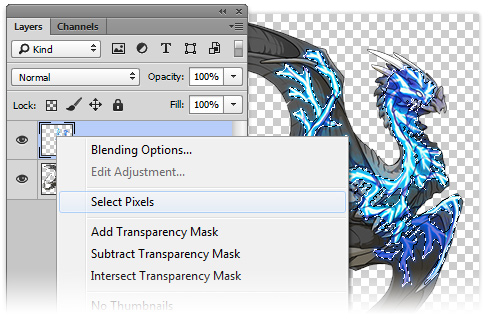
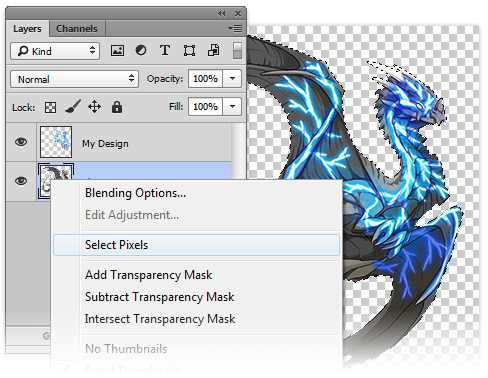
Right Click on your accent layer’s image thumbnail in the Layers palette. Click on ‘Select Pixels’. This will select all the pixels of your design, including your partially transparent pixels.
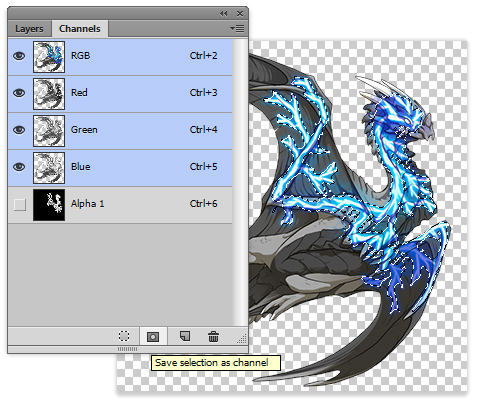
Go to your Channels Palette. If you can not find your Channels palette, go to the Windows menu, navigate to Windows--> Channels to make it appear or disappear.
At the bottom of the Channels palette is a button that shows a dark rectangle with a light circle in it. Click this button to save your selection as a black and white Alpha channel named Alpha 1.
Step 3: Calculate Your Coverage
Return to your Layers Palette and right click on the original dragon illustration’s layer image thumbnail. Click on ‘Select Pixels’. This will put a select lasso around the original dragon illustration.
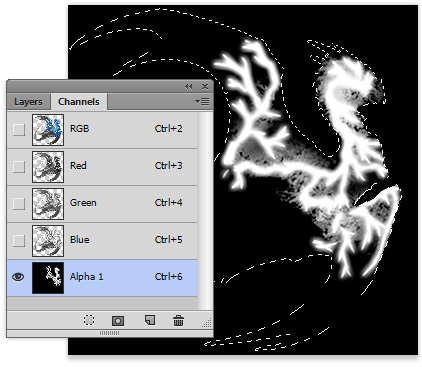
Return to your Channels palette and click on the Alpha 1 layer to select it. This will show a whited out version of your accent on a black background, with the silhouette of the original dragon illustration still outlined.
Open your Histogram palette. If you can not find your Histogram palette, go to the Windows menu, navigate to Windows--> Histogram to make it appear or disappear.
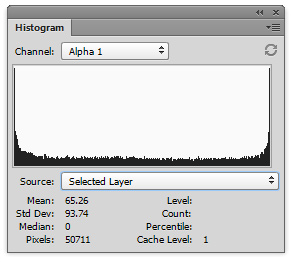
In the Histogram palette, make sure the Channel: drop down menu is set to Alpha 1.
Make sure the Source: drop down menu is set to Selected Layer.
Now check the Mean: number. This number is the numerical value that indicates how much of your design covers the original dragon illustration. For this example design, 65.26 is the Mean.
Now take the mean number and divide it by 255, the numerical value of pure white. Now multiply that number by 100. This will give you your percentage coverage: (Mean/255x100)=%
For this example, 65.26/255X100 = 25.59. The site does not round up decimal points, so the design used in this tutorial covers 25% of the original dragon illustration.
If the mean number is 79 (30%) or under, it should be submitted with an Accent blueprint.
If the mean number is 80 (31%) or over, then it should be submitted with a Skin blueprint.
Why Does This Work?
The more white that fills in the selection, the higher the Mean number. In these examples, the coverage percentage goes from 17,%, to 30%, to 76%. If the Mean number reaches 255, then the design covers 100% of the dragon.
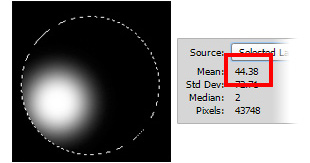 |
(44.38/255x100) = 17% |
|---|---|
 |
(78.00/255x100) = 30% |
 |
(196.11/255x100) = 76% |

