Back

Guides

Community created guides, helpful strategies, and more.
TOPIC | PS Elements Accent Layers Guide
1 2 3 4
I'm not sure if this Guide is needed, but a friend recently tried to make an accent in Elements and while I was trying to help her I realized something.... If you didn't know, the FR tutorial on Accent making only shows CS layers and not Elements.These are the layers you see when you load up a skin file in any of the Photoshop CS' programs: [img]https://31.media.tumblr.com/df6e26e1f17d230bc2a1daeecaf7918d/tumblr_inline_n137uri0a91qe7o9s.png[/img] Here I'm showing the Female Coatl skin file, but it's the same for every breed. On the other hand this is what you'll find if you open the Element's friendly version of the skin file: [img]https://31.media.tumblr.com/b52fe41fdd9dccc927e1e4b6c1969175/tumblr_inline_n137zrvxKO1qe7o9s.png[/img] As you can see, there's no accent group/layers. And if you're not familiar with how to make a Clip Mask well, then you can't really use Elements to make an accent. Now I know [url=https://www.adobe.com/cfusion/entitlement/index.cfm?e=cs2_downloads]CS2 is now free to download from Adobe[/url] (as long as you have an adobe account), but if you don't have that either because your computer can't handle it, or it doesn't like the file for some reason, and you're stuck with Elements that can be a big, giant, bummer. I'm gonna try to help with that by showing you how to make those missing layers. (Shown is Photoshop CS2 and PS Elements 6.0)
I'm not sure if this Guide is needed, but a friend recently tried to make an accent in Elements and while I was trying to help her I realized something....

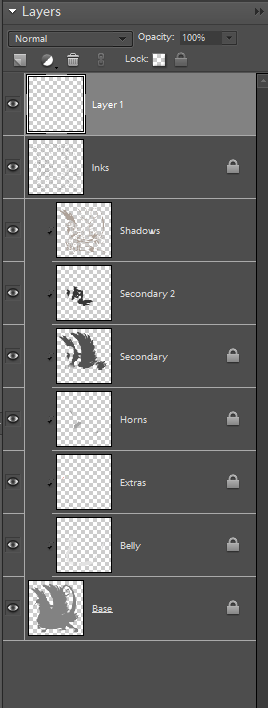
If you didn't know, the FR tutorial on Accent making only shows CS layers and not Elements.These are the layers you see when you load up a skin file in any of the Photoshop CS' programs:
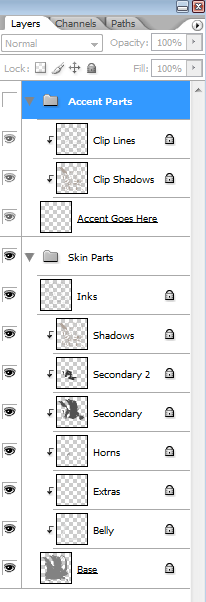
tumblr_inline_n137uri0a91qe7o9s.png

Here I'm showing the Female Coatl skin file, but it's the same for every breed.

On the other hand this is what you'll find if you open the Element's friendly version of the skin file:
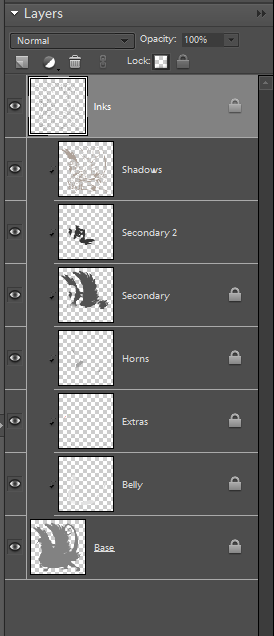
tumblr_inline_n137zrvxKO1qe7o9s.png

As you can see, there's no accent group/layers. And if you're not familiar with how to make a Clip Mask well, then you can't really use Elements to make an accent.

Now I know CS2 is now free to download from Adobe (as long as you have an adobe account), but if you don't have that either because your computer can't handle it, or it doesn't like the file for some reason, and you're stuck with Elements that can be a big, giant, bummer.

I'm gonna try to help with that by showing you how to make those missing layers.

(Shown is Photoshop CS2 and PS Elements 6.0)
tumblr_ncso1gTwpX1taslvjo2_250.png AMHq4NM.png forumone.gif
First, lets make a new layer and put it at the very top. [img]https://31.media.tumblr.com/efe15a265c509494076f00c0b426229a/tumblr_inline_n138o0p2Dx1qe7o9s.png[/img] And since in the CS layers it says "Accent Goes Here", lets make it named that so we don't get confused. Now we're going to duplicate the Shadow and Inks layers. [img]https://31.media.tumblr.com/ee40bb2bd852d845f74bc0d9d014a9cf/tumblr_inline_n138y0zmAo1qe7o9s.png[/img] Just Right Click and select "Duplicate Layer". A little box will pop up with the option to name the Duplicated Layer. [img]https://31.media.tumblr.com/4b9a6f11866f74f1312a3e9a3111e786/tumblr_inline_n1392uTuwr1qe7o9s.png[/img] Again, we'll go with what these Layers are originally named in the CS file. "Clip Shadows" and "Clip Lines" We're going to move those above your "Accent Goes Here" Layer. [img]https://31.media.tumblr.com/76e63899e46f7f708a13663b7d45eb4d/tumblr_inline_n139628sR81qe7o9s.png[/img] We're not done yet, however, since those are just normal layers above everything else. We have to group them with the "Accent Goes Here" layer To do this select your "Clip Lines" layer and go over to the "Layer" Tab. Select "Group with Previous" (Or hit the hotkeys Ctrl+G (Sorry I don't know what they are for Macs)(You can also hold ALT (Option on Macs) and click on the lines separating/between the layers. Your cursor will change into little overlapping circles. There's no image for this since screenshots don't take a picture of your cursor.)) [img]https://31.media.tumblr.com/c6b19638eb18812c5e7e1f26f36bc7af/tumblr_inline_n139ee3YsD1qe7o9s.png[/img] It'll make a little arrow pointing down to the layer under it [img]https://31.media.tumblr.com/6841fec26be9c7a8cb5aea7a9c542db9/tumblr_inline_n139hfp3IA1qe7o9s.png[/img] Do this again for the "Clip Shadows" Layer. Should end up looking like this: [img]https://31.media.tumblr.com/6fcf7175e2b677d0d2977054ba74c20b/tumblr_inline_n139kl1e921qe7o9s.png[/img] We're good to go now! Draw your Accent on the "Accent Goes Here" Layer and have fun! [img]https://31.media.tumblr.com/dd275965fbd0771331afe92e0957616d/tumblr_inline_n139oss5dh1qe7o9s.png[/img] Weee! Isn't this FUN. But we're drawing over the whole canvas and out of the lines! That's easy enough to fix. Just select the "Base" Layer (The very last layer of them all) Then select the "Magic Wand" tool [img]https://31.media.tumblr.com/8ea4fc3750f9fb2a80643ee3bf2815c3/tumblr_inline_n139tfeVfE1qe7o9s.png[/img] And then with the "All Layers" box unticked you can click anywhere on the inside lines of the art. [img]https://31.media.tumblr.com/04fe5ea4aa53c2ef5e9f291d0219ccaf/tumblr_inline_n139xpZnyA1qe7o9s.png[/img] Look at all those ants. (Alternatively you can also click on the transparent part of the image and go to Select>Inverse so you're only selecting the inside of the art) Now just select your "Accent Goes Here" Layer and you won't go out of the lines as long as the base continues to be selected! [img]https://31.media.tumblr.com/de53b16a36be34a8b4767ea33c519f0f/tumblr_inline_n13a1sHFs01qe7o9s.png[/img] Look, I'm staying in the lines, ma!
First, lets make a new layer and put it at the very top.

tumblr_inline_n138o0p2Dx1qe7o9s.png

And since in the CS layers it says "Accent Goes Here", lets make it named that so we don't get confused.

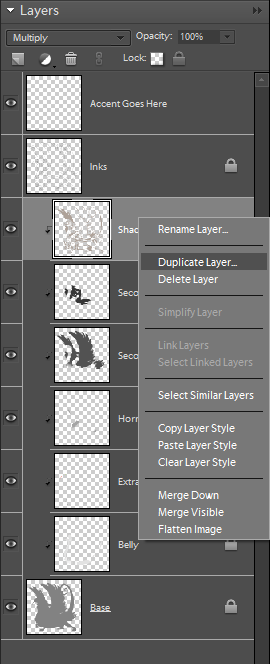
Now we're going to duplicate the Shadow and Inks layers.

tumblr_inline_n138y0zmAo1qe7o9s.png

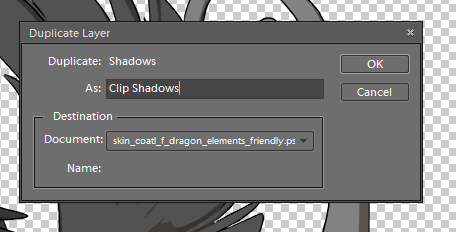
Just Right Click and select "Duplicate Layer". A little box will pop up with the option to name the Duplicated Layer.

tumblr_inline_n1392uTuwr1qe7o9s.png

Again, we'll go with what these Layers are originally named in the CS file. "Clip Shadows" and "Clip Lines"

We're going to move those above your "Accent Goes Here" Layer.

tumblr_inline_n139628sR81qe7o9s.png

We're not done yet, however, since those are just normal layers above everything else. We have to group them with the "Accent Goes Here" layer

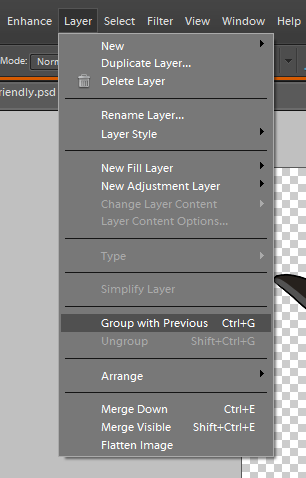
To do this select your "Clip Lines" layer and go over to the "Layer" Tab. Select "Group with Previous" (Or hit the hotkeys Ctrl+G (Sorry I don't know what they are for Macs)(You can also hold ALT (Option on Macs) and click on the lines separating/between the layers. Your cursor will change into little overlapping circles. There's no image for this since screenshots don't take a picture of your cursor.))

tumblr_inline_n139ee3YsD1qe7o9s.png

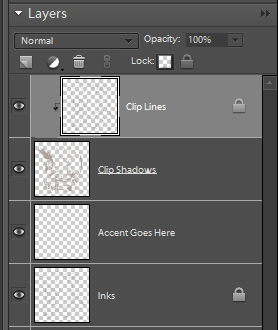
It'll make a little arrow pointing down to the layer under it

tumblr_inline_n139hfp3IA1qe7o9s.png

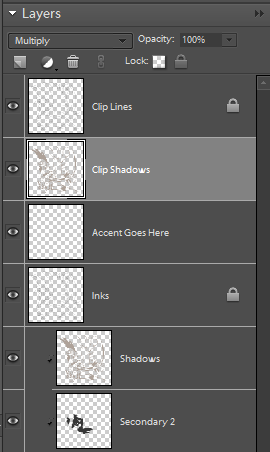
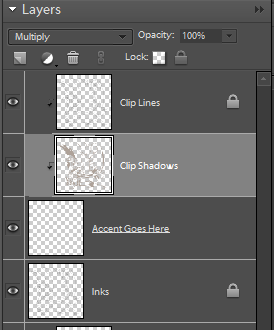
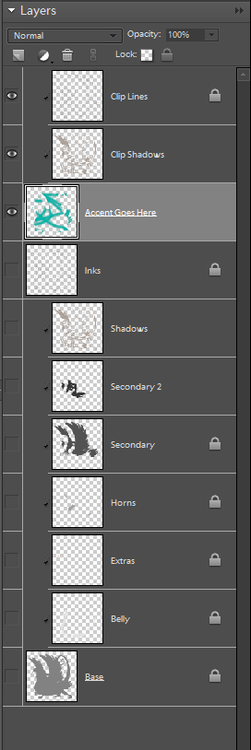
Do this again for the "Clip Shadows" Layer. Should end up looking like this:

tumblr_inline_n139kl1e921qe7o9s.png

We're good to go now!

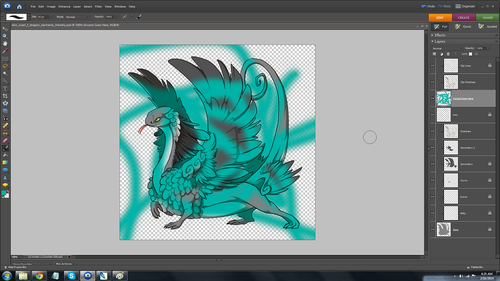
Draw your Accent on the "Accent Goes Here" Layer and have fun!

tumblr_inline_n139oss5dh1qe7o9s.png

Weee! Isn't this FUN.

But we're drawing over the whole canvas and out of the lines!

That's easy enough to fix.

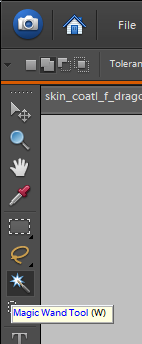
Just select the "Base" Layer (The very last layer of them all) Then select the "Magic Wand" tool

tumblr_inline_n139tfeVfE1qe7o9s.png

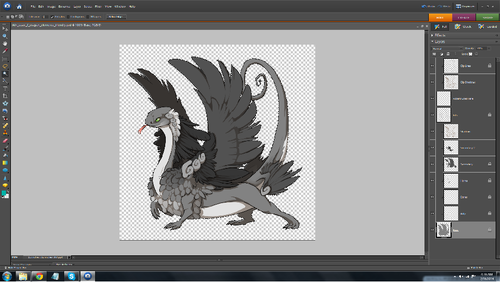
And then with the "All Layers" box unticked you can click anywhere on the inside lines of the art.

tumblr_inline_n139xpZnyA1qe7o9s.png

Look at all those ants. (Alternatively you can also click on the transparent part of the image and go to Select>Inverse so you're only selecting the inside of the art)

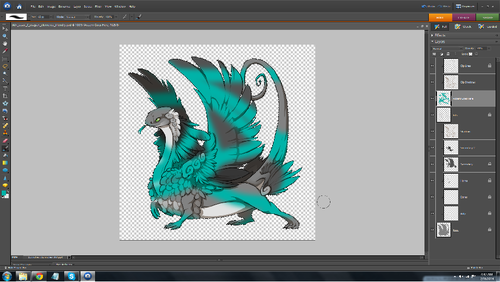
Now just select your "Accent Goes Here" Layer and you won't go out of the lines as long as the base continues to be selected!

tumblr_inline_n13a1sHFs01qe7o9s.png

Look, I'm staying in the lines, ma!
tumblr_ncso1gTwpX1taslvjo2_250.png AMHq4NM.png forumone.gif
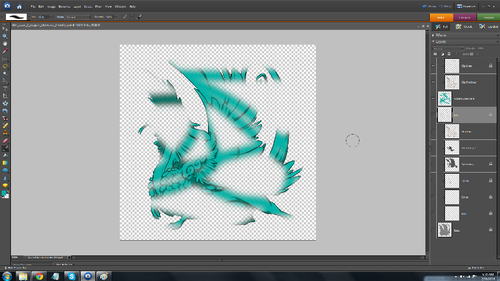
As for saving... Because we don't have group layers in Elements you'll need to manually hide all of the layers that don't have to do with the Accent. That means all the layers UNDER your "Accent Goes Here" Layer. [img]https://31.media.tumblr.com/d58fc2cae727e0ee1dc074b1c012cb26/tumblr_inline_n13c5qxpFv1qe7o9s.png[/img] Once those are all hidden and only your Accent layers are seen it should look something like this: [img]https://31.media.tumblr.com/ca6dfc7fe7aac49dd244b51a59e8bb44/tumblr_inline_n13c85LSpx1qe7o9s.png[/img] Only, you know, with an actual accent and not just crazy scribbles. You'll now have to merge your accent layers. Select all your Accent layers by clicking the top layer, holding shift, then clicking the bottom layer, then right click on any of them and select "Merge Visible" (This will rename the newly merged layers to whatever your top layer is called, in this case "Clip Lines") [img]https://31.media.tumblr.com/f53ca81f04f4c4b4aa67f1dc534519e4/tumblr_inline_n13cd3ms271qe7o9s.png[/img] I'll take this right out of the FR Tutorial for Skins and Accents: [b]Do not flatten your image[/b]. Doing so will negate the transparent areas of the image. Accents that do not have transparent backgrounds will not be accepted. If you have transparency turned off your dragon will be covered by a giant square of white paint with some accents thrown on top. Now we have to resize this baby. Go to the top tabs and find Image>Resize>Image Size [img]https://31.media.tumblr.com/89f71861742f026fb67111fd39bc332f/tumblr_inline_n13cne5rXi1qe7o9s.png[/img] This window should pop up: [img]https://31.media.tumblr.com/a15e17eeea09dbc2bca2150d730e5af8/tumblr_inline_n13cs6cmGF1qe7o9s.png[/img] We're going to change the Pixel Size to 350x350 pixels. As long as the "Resample Image: Bicubic" box is ticked you can do this. [img]https://31.media.tumblr.com/eec611b991176fcf66b280b77d1644e3/tumblr_inline_n13cy55boD1qe7o9s.png[/img] Hit OK and it'll resize it. Now we have to save as a .PNG image. (.PNG will preserve the transparency) Lets go to File>Save for Web... [img]https://31.media.tumblr.com/ccd626a704e23e665e47975529f10cc6/tumblr_inline_n13d3uYyLP1qe7o9s.png[/img] A large window little pop up. And for me it covers the whole screen and has two images of your canvas in it. On the right hand side there should be a drop down box right next to "Present:" Find and click on PNG-24 [img]https://31.media.tumblr.com/d94b3e97c32543a373e07a05479eb271/tumblr_inline_n13dauzuRB1qe7o9s.png[/img] The settings under the Present: PNG-24 will change. Make sure the Transparency box is ticked. [img]https://31.media.tumblr.com/17a3afe01234d724fbffd6db6d7d03ff/tumblr_inline_n13ddey8Fx1qe7o9s.png[/img] Click OK and the regular Save As window will pop up. [img]https://31.media.tumblr.com/f53fa5eed9e48fffc150e99992d64444/tumblr_inline_n13dh1uXjw1qe7o9s.png[/img] (Ignore my many, many folders, they are silly.) Save it where you like. In my case, no where since I don't wanna save scribbles. But if I was it'd go in my Flight Rising>Skins folder. Follow the rest of the [url=http://flightrising.com/main.php?p=skins&tab=tutorial]FR Skin/Accent Tutorial[/url], and the [url=http://flightrising.com/main.php?p=skins&tab=info]rules[/url], and you're on your way to making an awesome Accent! (Shown is Photoshop CS2 and PS Elements 6.0)
As for saving...

Because we don't have group layers in Elements you'll need to manually hide all of the layers that don't have to do with the Accent.

That means all the layers UNDER your "Accent Goes Here" Layer.

tumblr_inline_n13c5qxpFv1qe7o9s.png

Once those are all hidden and only your Accent layers are seen it should look something like this:

tumblr_inline_n13c85LSpx1qe7o9s.png

Only, you know, with an actual accent and not just crazy scribbles.

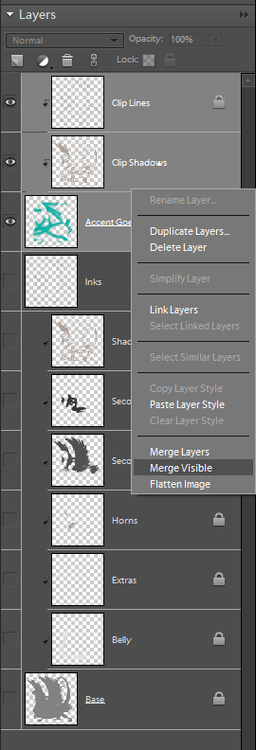
You'll now have to merge your accent layers. Select all your Accent layers by clicking the top layer, holding shift, then clicking the bottom layer, then right click on any of them and select "Merge Visible" (This will rename the newly merged layers to whatever your top layer is called, in this case "Clip Lines")

tumblr_inline_n13cd3ms271qe7o9s.png

I'll take this right out of the FR Tutorial for Skins and Accents:

Do not flatten your image. Doing so will negate the transparent areas of the image. Accents that do not have transparent backgrounds will not be accepted. If you have transparency turned off your dragon will be covered by a giant square of white paint with some accents thrown on top.


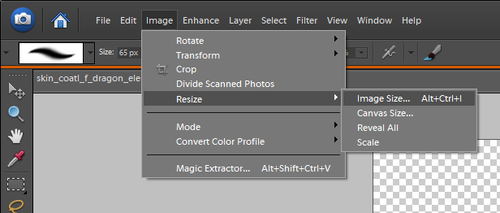
Now we have to resize this baby.

Go to the top tabs and find Image>Resize>Image Size

tumblr_inline_n13cne5rXi1qe7o9s.png

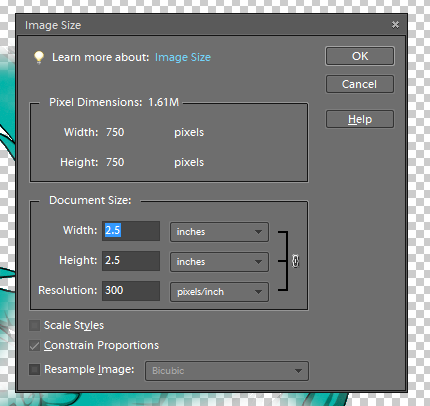
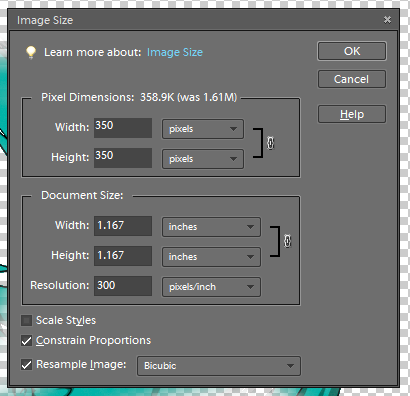
This window should pop up:

tumblr_inline_n13cs6cmGF1qe7o9s.png

We're going to change the Pixel Size to 350x350 pixels.

As long as the "Resample Image: Bicubic" box is ticked you can do this.

tumblr_inline_n13cy55boD1qe7o9s.png

Hit OK and it'll resize it.

Now we have to save as a .PNG image. (.PNG will preserve the transparency)

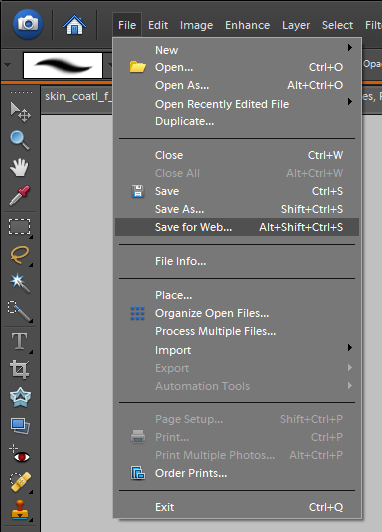
Lets go to File>Save for Web...

tumblr_inline_n13d3uYyLP1qe7o9s.png

A large window little pop up. And for me it covers the whole screen and has two images of your canvas in it.

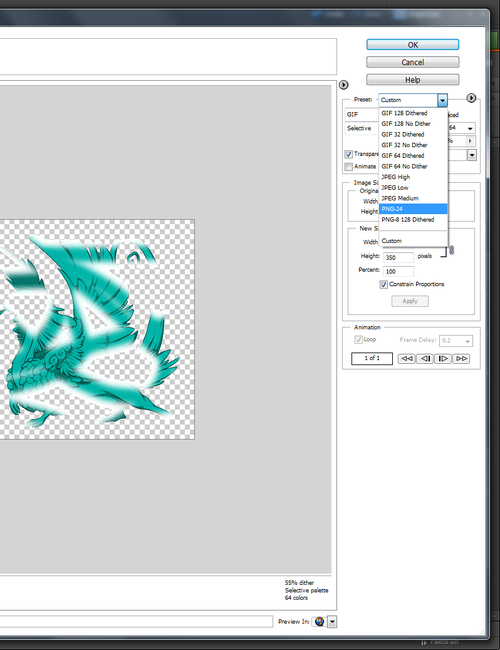
On the right hand side there should be a drop down box right next to "Present:" Find and click on PNG-24

tumblr_inline_n13dauzuRB1qe7o9s.png

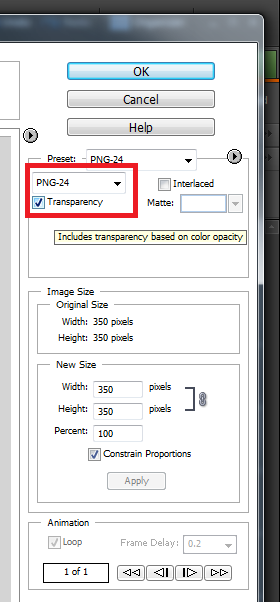
The settings under the Present: PNG-24 will change.

Make sure the Transparency box is ticked.

tumblr_inline_n13ddey8Fx1qe7o9s.png

Click OK and the regular Save As window will pop up.

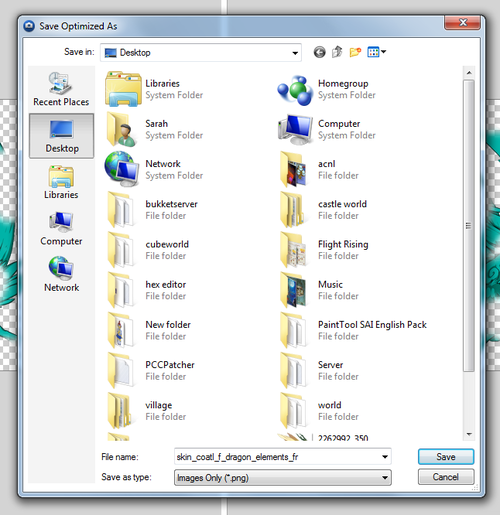
tumblr_inline_n13dh1uXjw1qe7o9s.png

(Ignore my many, many folders, they are silly.)

Save it where you like. In my case, no where since I don't wanna save scribbles. But if I was it'd go in my Flight Rising>Skins folder.

Follow the rest of the FR Skin/Accent Tutorial, and the rules, and you're on your way to making an awesome Accent!

(Shown is Photoshop CS2 and PS Elements 6.0)
tumblr_ncso1gTwpX1taslvjo2_250.png AMHq4NM.png forumone.gif
Did this little guide help you? Then yay! Share and comment and stuff so I know it's appreciated.

This didn't help you? Uh oh, I'm sorry. What didn't it help you with? I wanna know so I can fix it!

I'm not sure if every step is the same with every version of Elements as I only have 6.0 to work with. If it is not, let me know so I can add to the guide.


Edit: Added how to resize and save because I realized it may be a bit different in Elements.

Edit: Sent an email off to the FR staff about the missing accent layers in the Elements files and they have forwarded this onto the art team


@Thalestris
tumblr_ncso1gTwpX1taslvjo2_250.png AMHq4NM.png forumone.gif
@JinxFlux Great job! I'm a Photoshop user myself, but I'm sure that those who only have access to Elements will find this really helpful! ^w^


» She/Her | FR + 3
» Nature Dom Team
» Pings encouraged!
» Discord: myrtana.
»'Wishlist'|'AvatarxDragon
- - - - - Ink wash brush-style art of three red and gold Wildclaws performing a dragon dance with a green Auraboa puppet, with text for Nature's Year of the Wood Dragon push.
-
-
-
@Anukai
Thanks!
Even with CS2 being free I'm sure there's some who will still be stuck or prefer elements. So since I noticed it and figured a way to fix it I thought I might as well help anyone else with the problem. c:
@Anukai
Thanks!
Even with CS2 being free I'm sure there's some who will still be stuck or prefer elements. So since I noticed it and figured a way to fix it I thought I might as well help anyone else with the problem. c:
tumblr_ncso1gTwpX1taslvjo2_250.png AMHq4NM.png forumone.gif
@JinxFlux this is amazing :D
fr_plaguebanner_by_seepranne-d6ghm2z.gif
@JinxFlux
Great guide, helped me a great deal. :) Haven't got anything but Elements myself, so I didn't have any other choice than to find a way to make it work.
@JinxFlux
Great guide, helped me a great deal. :) Haven't got anything but Elements myself, so I didn't have any other choice than to find a way to make it work.
Timezone - GMT+1 - 9 hours difference from FR.
Thank you so so much for this! I'm wondering, would I use this technique for making a skin as well? I couldn't find a tutorial on skins... thanks again!!
tumblr_nr08ruQytB1s6fg0ro7_r1_100.gifI want to draw your Ridgebacks/WCs! tumblr_nr08ruQytB1s6fg0ro6_r1_100.gif
@Rileybean
You can just use the existing layers. No need to make new ones unless that's your style/process.
@Rileybean
You can just use the existing layers. No need to make new ones unless that's your style/process.
tumblr_ncso1gTwpX1taslvjo2_250.png AMHq4NM.png forumone.gif
1 2 3 4