Back

Guides

Community created guides, helpful strategies, and more.
TOPIC | Kelp Beds - Leviathan Leveler - 2 Fodder
1 2 3 4 5 6 7 ... 13 14
First off, this build was inspired by @ FeDog 's Kelp Beds Kraken build: http://www1.flightrising.com/forums/gde/2450522/1

Thanks to Pachirisu and Illyrael for coming up with a new name (Leviathan Leveler) for this build. I'll be calling it the Levi since it's a lot shorter than Leviathan.


Unlike FeDog's build, this build is made to Rally + Eliminate all monsters (except bosses) in the venue.

This build does best with 2 fodder. 1 fodder (and one empty slot) does not work well in my play experience.


Post Index:

What Stats and Why

Which Element to Pick

Enemies You'll Face

What to do on Your Turn

What to do Against Each Group

Slight Variants


I would like to thank:
FeDog - Posting their build to inspire this build

Sylvandyr - Their stat tools (found HERE)

Pachirisu and Illyrael - Name of this build

Need a fodder trainer build? Try one of these:
Kelp Beds - Leviathan Leveler - 2 Fodder Trainer
GLR + Mire - Ghire Gorer - 2 Fodder
Mire - Mire Mauler - 2 Fodder
GLR - Ruin Wrecker - 2 Fodder Trainer
Boreal Wood- Boreal Banisher - 2 Fodder Trainer
Harpy's Roost - Roost Rustler - 2 Fodder Trainer
Launch_Plans_-_Small.png
(Don't ping the staff)
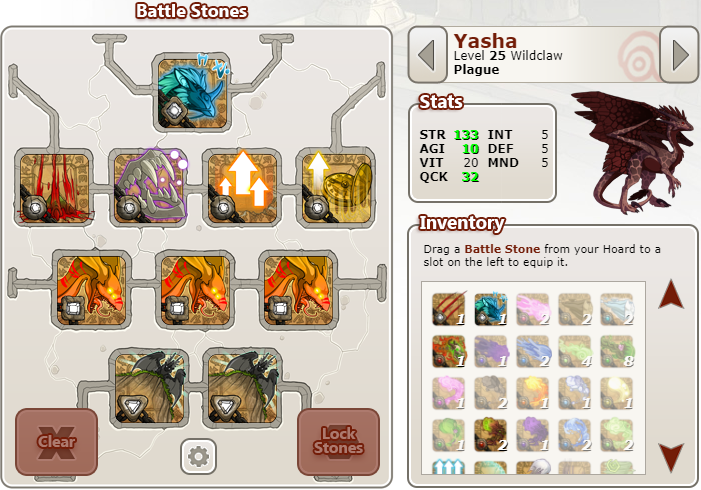
[columns] [b]Stats:[/b] STR AGI DEF QCK [nextcol] 133 10 5 32 [nextcol] | | | | [nextcol] INT VIT MND [nextcol] 5 20 5 [nextcol] | | | | [nextcol] [b]Stones:[/b] Meditate Rally Berserker Ambush [nextcol] Eliminate Berserker Ambush [nextcol] Sap [nextcol] Haste [/columns] [img]https://s26.postimg.cc/ryz404zyh/Stats.png[/img] The reasoning for the stats is as follows: Str 133 allows the Levi to Rally + Elim everything in the venue (other than bosses) Qck 32 plus 30 from haste allows me to take an extra turn at the beginning (it's equal to the fastest enemy in the venue) Vit 20 allows the Levi to take a few hits before you need to refresh. Agi 10 is where the remaining 4 points were put (Def would be better, but it makes little difference).
Stats:
STR
AGI
DEF
QCK

133
10
5
32

|
|
|
|

INT
VIT
MND


5
20
5


|
|
|
|
Stones:
Meditate
Rally
Berserker
Ambush


Eliminate
Berserker
Ambush

Sap
Haste

Stats.png

The reasoning for the stats is as follows:
Str 133 allows the Levi to Rally + Elim everything in the venue (other than bosses)

Qck 32 plus 30 from haste allows me to take an extra turn at the beginning (it's equal to the fastest enemy in the venue)

Vit 20 allows the Levi to take a few hits before you need to refresh.

Agi 10 is where the remaining 4 points were put (Def would be better, but it makes little difference).
Need a fodder trainer build? Try one of these:
Kelp Beds - Leviathan Leveler - 2 Fodder Trainer
GLR + Mire - Ghire Gorer - 2 Fodder
Mire - Mire Mauler - 2 Fodder
GLR - Ruin Wrecker - 2 Fodder Trainer
Boreal Wood- Boreal Banisher - 2 Fodder Trainer
Harpy's Roost - Roost Rustler - 2 Fodder Trainer
Launch_Plans_-_Small.png
(Don't ping the staff)
I'll now go through the various dragon elements and say which I think are best, and which are worst. This is based on which elements are super effective against your dragon's element. (I'm only counting the elements for spell-casting enemies since the melee enemies don't usually use their element attack before you kill them). My scale will be Great, Good, Doable, Bad, and Terrible [b]Resistant to[/b] is how many enemies deal less damage to your dragon (higher # = good) [b]Weak to[/b] is how many enemies deal more damage to your dragon (higher # = bad) [columns] [b]Element[/b] Arcane Earth Fire Ice Light Lightning Nature Plague Shadow Water Wind [nextcol] |[b]Rank[/b] |Terrible |Terrible |Bad |Great |Bad |Doable |Good |Doable |Bad |Good |Terrible [nextcol] |[b]Resistant to[/b] |1 |0 |2 |3 |2 |1 |3 |2 |2 |3 |1 [nextcol] |[b]Weak to[/b] |3 |5 |3 |1 |3 |2 |2 |2 |3 |2 |4 [/columns] ----- If you don't want to read the chart, here's the ranking from best to worst [b]1st (Best):[/b] Ice [b]2nd (Good):[/b] Nature Water [b]3rd (Doable):[/b] Lightning Plague [b]4th (Bad):[/b] Fire Light Shadow [b]5th (Worst):[/b] Arcane Earth Wind ----- Here's a chart to show what elements are strong/weak to what [img]http://i.imgur.com/lLliwWS.png[/img]
I'll now go through the various dragon elements and say which I think are best, and which are worst. This is based on which elements are super effective against your dragon's element. (I'm only counting the elements for spell-casting enemies since the melee enemies don't usually use their element attack before you kill them).

My scale will be Great, Good, Doable, Bad, and Terrible

Resistant to is how many enemies deal less damage to your dragon (higher # = good)
Weak to is how many enemies deal more damage to your dragon (higher # = bad)

Element
Arcane
Earth
Fire
Ice
Light
Lightning
Nature
Plague
Shadow
Water
Wind
|Rank
|Terrible
|Terrible
|Bad
|Great
|Bad
|Doable
|Good
|Doable
|Bad
|Good
|Terrible
|Resistant to
|1
|0
|2
|3
|2
|1
|3
|2
|2
|3
|1
|Weak to
|3
|5
|3
|1
|3
|2
|2
|2
|3
|2
|4


If you don't want to read the chart, here's the ranking from best to worst

1st (Best):
Ice

2nd (Good):
Nature
Water

3rd (Doable):
Lightning
Plague

4th (Bad):
Fire
Light
Shadow

5th (Worst):
Arcane
Earth
Wind


Here's a chart to show what elements are strong/weak to what
lLliwWS.png
Need a fodder trainer build? Try one of these:
Kelp Beds - Leviathan Leveler - 2 Fodder Trainer
GLR + Mire - Ghire Gorer - 2 Fodder
Mire - Mire Mauler - 2 Fodder
GLR - Ruin Wrecker - 2 Fodder Trainer
Boreal Wood- Boreal Banisher - 2 Fodder Trainer
Harpy's Roost - Roost Rustler - 2 Fodder Trainer
Launch_Plans_-_Small.png
(Don't ping the staff)
Even with this build working the best, you still will take hits from the enemy. This is due to the nature of the coliseum and venue, and not being able to have enough Str and Qck to be fast enough to kill everything before it gets a change to attack.

An all mage/spell caster group of enemies will get 1 spell cast at your dragons, and an all melee group will get 3 hits on your dragons.

Mages:
Abyss Striker
Cloud Chaser
Jeweled Octoflyer
Kelp Caretaker
Maren Ambusher
Maren Harvester
Maren Wavesinger
Octoflyer
Ruche Slug
Ruched Sojourner
Shadow
Wind
Arcane
Nature
Nature
Ice
Water
Water
Light
Plague


Melee:
Blue-Footed Eggull
Corrosive Depin
Depin
Eggull
Golden Porpoise
Kelp Tender
Mammertee
Maren Fisher
Maren Scout
Maren Seahunter
Maren Warrior
Relic Eel
Neutral
Shadow
Neutral
Earth
Light
Water
Neutral
Wind
Fire
Water
Lightning
Earth

*NOTE: It was pointed out that this build can't Rally + Elim the NotN enemies, and thats true because you need 140 base Str which isn't possible. During the event, I suggest grinding in lower venues, and training fodder in the Mire or Ghostlight Ruins.
Need a fodder trainer build? Try one of these:
Kelp Beds - Leviathan Leveler - 2 Fodder Trainer
GLR + Mire - Ghire Gorer - 2 Fodder
Mire - Mire Mauler - 2 Fodder
GLR - Ruin Wrecker - 2 Fodder Trainer
Boreal Wood- Boreal Banisher - 2 Fodder Trainer
Harpy's Roost - Roost Rustler - 2 Fodder Trainer
Launch_Plans_-_Small.png
(Don't ping the staff)
First Battle:
1) Meditate
2) Haste (targeting Levi )
3) Rally (targeting Levi )
3) Defend
4) Eliminate

Meditate, haste, and rally will generate enough breath to cast eliminate. You need to defend because you still have 1 turn left before the penalty of meditate wears off.


Second Battle:
1) Haste (targeting Levi )
2) Rally (targeting Levi )
3) Eliminate

Using haste will give you a free turn (it uses a turn and adds a turn), as well as allows your dragon to keep up with the monsters. Rally increases your attack, and eliminate all the enemies.


Enemy Attack Order:
Hit the melee enemies first, and the mages last. The mage has a chance at charging instead of attacking so you won't take more damage.


Sap Usage:
I tend to use sap when there's one mage left, and it attacked because it has to meditate.

You can also use 3 saps on the last mage if you have the breath for it, this should gain you more health than you lose even if they attack.

The more you play with the Levi build, the more comfortable you'll be using sap. I've had a few times where I got my fodder from 1 to 7 without stopping because of sap, but that's uncommon. It's more common that using sap will let you stay for 1-3 more battles.


Refresh:
When training fodder and need to refresh, I suggest putting the fodder's stats into vitality so that they can take more hits instead of your trainer. In contrast to the Mire, this helps a lot in the Kelp Beds, and it is worth the small amount of time it takes.

This isn't really needed if you're training to level 5, but you can still do it if you want. It's most helpful if you're training to 6-7 or higher.

Dodge:
If you miss an Elim and don't have enough breath to cast it again, you should refresh. The only time you might not need to refresh is when there's only 1 caster remaining: then you can decide if it's worth setting up your breath again.

Note: If you're 5-10 breath away from Elim, you can cast Haste + Rally to get that breath instead of casting Meditate.
Need a fodder trainer build? Try one of these:
Kelp Beds - Leviathan Leveler - 2 Fodder Trainer
GLR + Mire - Ghire Gorer - 2 Fodder
Mire - Mire Mauler - 2 Fodder
GLR - Ruin Wrecker - 2 Fodder Trainer
Boreal Wood- Boreal Banisher - 2 Fodder Trainer
Harpy's Roost - Roost Rustler - 2 Fodder Trainer
Launch_Plans_-_Small.png
(Don't ping the staff)
*NOTE:* All of these numbers are assuming you don't miss an attack. You might want to refresh if you miss an eliminate before your breath it at 70 (70 breath is the point where missing with eliminate still leaves you with enough breath to try again).
Enemy Groups

2 Mages
1 Mage + 1 Melee
3 Mages
2 Mages + 1 Melee
1 Mage + 2 Melee
2 Mages + 2 Melee
2 Melee
3 Melee
Max Hits Turn 1

1
3
4
5
7
9
5
9
Max Hits Later

0
0
1
1
2
3
1
3
Refresh Turn 1

No
No
No
No
Maybe
Yes
No
Yes

2 Mages
First battle: These are your favorite to start with.
Later Battles: These are very easy later on.

1 Mage + 1 Melee
First battle: These are your 2nd favorite to start with.
Later Battles: These are very easy later on.

3 Mages
First battle: These are very good to start with.
Later Battles: These are very easy later on.

2 Mages + 1 Melee
First Battle: These aren't the best group to start against, but you are able to.
Later Battles: These are just as easy as the 3 mages.

1 Mages + 2 Melee
First Battle: These are harder to take on, but it's still possible (hope the enemies target the dragons you're leveling).
Later Battle: These are pretty easy later on.

2 Mages + 2 Melee
First Battle: These are pretty hard, and I would just say refresh.
Later Battles: These are pretty easy to take on.

2 Melee
First Battle: These aren't the best to take on, but they're doable.
Later battles: These are easy to take on.

3 Melee
First Battle: These are VERY hard, so just refresh.
Later battles: These are still a challenge later on.

Bosses:
Don't try taking them on, just refresh. They aren't worth the time or effort to try and beat it.
Need a fodder trainer build? Try one of these:
Kelp Beds - Leviathan Leveler - 2 Fodder Trainer
GLR + Mire - Ghire Gorer - 2 Fodder
Mire - Mire Mauler - 2 Fodder
GLR - Ruin Wrecker - 2 Fodder Trainer
Boreal Wood- Boreal Banisher - 2 Fodder Trainer
Harpy's Roost - Roost Rustler - 2 Fodder Trainer
Launch_Plans_-_Small.png
(Don't ping the staff)
Other Variants
All of these variant use the same stats, only some of the stones change.

IndyMystery's - Manta Mauler:
This build uses reflect instead of sap. This allows you to use mages to gain breath, and to fight bosses (sometimes).

There are a couple options for what you do against mage groups (melee groups follow the normal method discussed in the previous posts):
1) Cast the normal Haste, Rally, Eliminate
2) Cast Reflect
3) Eliminate again so there's only one mage left
4) Meditate a few times
5) Use Potions, Defend, or Rally*
6) Eliminate

*Rally will be reflected onto the enemy
This cause them to hit themselves harder
Making killing them with eliminate easier
| 1) Cast the normal Haste, Rally, Eliminate
| 2) Cast Reflect
| 3) Cast Meditate and Eliminate
| 4) Cast Reflect when it wears off
|
|
|
|
|
|

Meditate's debuff has little effect since Reflect prevents most (if not all) mage spells from hitting you, so you can keep casting Meditate, Eliminate, and Reflect until you kill all the mages.

This variant is slower, but has a much easier time against mages and bosses. (Bosses are possible).

For more information, check IndyMaster's post about this variant: http://www1.flightrising.com/forums/gde/2469655/4#post_36212195


SassmasterMaxie's - Anticipate Assassin:
This build uses Anticipate instead of Meditate. Meditate is guaranteed to get you the breath needed to Eliminate, it's possible to take 3 melee hits before you get a chance to defend due to the debuff. Anticipate fixes this by allowing you to "defend" (Anticipate applies the defend buff), and gain the needed breath earlier.

The turn order for the first turn is:
1) Haste
2) Rally
3) Anticipate
4) Eliminate

The rest of the turns behave the same.

This variant can be faster or slower to build the needed breath, but it can be fun to use, and a nice change if you keep getting melee starter packs.
Need a fodder trainer build? Try one of these:
Kelp Beds - Leviathan Leveler - 2 Fodder Trainer
GLR + Mire - Ghire Gorer - 2 Fodder
Mire - Mire Mauler - 2 Fodder
GLR - Ruin Wrecker - 2 Fodder Trainer
Boreal Wood- Boreal Banisher - 2 Fodder Trainer
Harpy's Roost - Roost Rustler - 2 Fodder Trainer
Launch_Plans_-_Small.png
(Don't ping the staff)
I've been using this build the last couple days and it works pretty well. This isn't the build to use if you're only leveling to 4 or 5 as you have to be a little more picky about starting groups than in Ghostlight or Mire. Levels 6-7 are the sweet spot. There will need to be some batch timing done to see where it actually falls.

The best time to use Sap for a health boost is with one caster left who's built breath once and then attacked (preferably one of your trainees). The chances are they will need to build breath again before another attack. Sap will generally only prolong the inevitable.

Resetting after being dodged is usually the best choice since even if you manage to recover, you'll likely have taken enough hits that you won't last long afterwards anyway.
tumblr_inline_nebbd6PAZE1qmu9vp.png
Hallos.
This works VERY well!
Just remember to let meditation exhaustion fall off (my bad habit so far), and reset when needed!
Yay for fast leveling!
I keep health potions in claw for emergencies, but I've made it to fodder level 7 without resetting.
~Lacy
Hallos.
This works VERY well!
Just remember to let meditation exhaustion fall off (my bad habit so far), and reset when needed!
Yay for fast leveling!
I keep health potions in claw for emergencies, but I've made it to fodder level 7 without resetting.
~Lacy
I'm glad you're enjoying the build :)

I using this to train my fodder to 6 or 7, it depends on my mood and how well my Levi is doing (if it's full health, I'll go to 7).
I'm glad you're enjoying the build :)

I using this to train my fodder to 6 or 7, it depends on my mood and how well my Levi is doing (if it's full health, I'll go to 7).
Need a fodder trainer build? Try one of these:
Kelp Beds - Leviathan Leveler - 2 Fodder Trainer
GLR + Mire - Ghire Gorer - 2 Fodder
Mire - Mire Mauler - 2 Fodder
GLR - Ruin Wrecker - 2 Fodder Trainer
Boreal Wood- Boreal Banisher - 2 Fodder Trainer
Harpy's Roost - Roost Rustler - 2 Fodder Trainer
Launch_Plans_-_Small.png
(Don't ping the staff)
1 2 3 4 5 6 7 ... 13 14